Как создать свою карточную игру на компьютере
Learn to Create Games
Create your own games easily and learn to code in the process
How to Create a Card Game in Unity
After completing this post, you will be able to:
- Create a card game. Change the sprite of an object at run-time. Check when two cards picked by the player have the same value. Shuffle the cards.
Introduction
In this post, we will create a new card game as follows:

Figure 1: An example of the game completed
Setting-up the interface
First, we will import the new deck of cards:


Figure 3: Changing the attribute Texture Type

- Please create a new square sprite: from the Project window select Create | Sprites | Square. Rename this new asset Tile and drag and drop it to the Scene view, as illustrated on the next figure.

Next, we will create a script that will process clicks on this sprite.
- Please create a new C# script called Tile (i. e., from the Project window, select Create | C# Script). Open this script. Add the following function to it.
- Please select the object called Tile in the Hierarchy. Using the Inspector, you will see that it has a component called Sprite Renderer, with an attribute called Sprite, as described on the next figure.

Figure 5: Identifying the Sprite Renderer component
- Drag and drop one of the images that you have imported from the Project window (i. e., from the folder called Cards) to the attribute called Sprite, for example the Two of hearts, as illustrated in the next figure.


Figure 6: Setting the appearance of the card.
- When the mouse is clicked, we check whether the card is currently revealed or hidden. If it is revealed, then we call the function HideCard. Otherwise, we call the function RevealCard.
- Please select the object Tile in the Hierarchy. Drag and drop it to the Project window. This should create a new Prefab called Tile, as illustrated on the next figure.
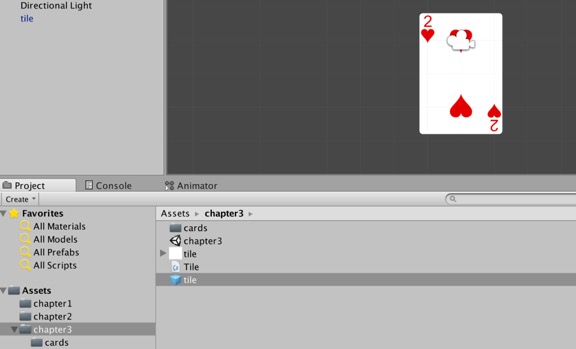
Figure 9: Creating a prefab from the card
Creating a game manager
public GameObject card; void Start () < displaycards(); >Public void displayCards()
- Please select the object GameManager in the Hierarchy. Drag and drop the prefab called Tile to the field called Card, in the component called ManageCards, as illustrated on the next figure.

Figure 10: Initializing the variable called card
- Once this is done, you can test the game by playing the scene; you should see that a card has been added to the game, as described in the next figure.

public void setOriginalSprite(Sprite newSprite)
- Please save this script (i. e., the script called Tile). Please open the script ManageCards. Add the following function to the class.
- We declare a function called AddACard. This function creates a new card. We can now modify the function called DisplayCards as follows:
Adding multiple cards automatically
- Create and add new cards based on the prefab created earlier. Arrange the cards so that they are aligned around the center of the screen and all visible onscreen. For each card, set the default sprite that should be displayed when the card is revealed. Shuffle the cards.
So the first step will be to add all of these cards.
- Next, we can modify the function called DisplayCards so that we can add a row of 10 cards, with the following code (new code in bold).
- Please save your code and play the scene; you will notice that 10 cards have been created; however, some of them are outside the screen; in other words, the cards need to be centered around the center of the screen.

So, to solve this issue, we will do the following:
- Create an empty object that will be used as an anchor for the cards. Move this object to the center of the screen. Center the cards horizontally around this object.
- Please create an empty object and call it CenterOfScreen. Using the Inspector, change its position to (0, 0, 0). Open the script ManageCards and modify the function AddACard as follows (new code in bold):

- Using the Inspector, change the scale of the Tile prefab to (0.3, 0.3, 0.3). Open the script called ManageCards and modify it as follows (new code in bold):

Figure 14: Displaying and scaling the cards
Associating the correct image to each card

Figure 15: Displaying cards with a similar image
- Please select the prefab called Tile in the Project window. Using the Inspector, click to the right of the label called Tag.

Figure 16: Checking tags already created
- If you have already completed the previous chapters, you should see that the tags 1, 2, 3, and 4 have already been created; if not, we can create these in the next steps. Please click on Add Tag.


- This will create new fields that you can use to create additional tags, by typing a number (for a new tag) to the right of the fields which name starts with Tag, as illustrated on the next figure.

We can then use these tags from our code.

- Moving all the images that we have imported to a “recognized” or “standard” folder that we can access from our script. Accessing the images from this folder. Associating a corresponding image based on the rank of the card created.

Figure 20: Checking the folder Resources
If this is not the case, we can create this folder as follows:
- In the Project window, select the folder called Assets. Then, from the Project window, select Create | Folder.


Figure 23: Moving the images to the Resources folder
- If you then check the content of the folder called Resources, you should see that the cards were moved successfully, as illustrated in the next figure.

Figure 24: Checking that the cards have been copied properly

Shuffling the cards
Public int [] createShuffledArray() < int [] newarray = new int [] ; int tmp; for (int t = 0; t < 10; t++ ) < tmp = newarray[t]; int r = random.range(t, 10); newarray[t] = newarray[r]; newarray[r] = tmp; >Return newArray; >
This shuffling function is based on the Fisher-Yates algorithm.
Void addACard(int rank, Int value)
Int [] shuffledArray = createShuffledArray(); for (int i = 0; i < 10; i++) < //addacard (i); addacard (i,shuffledarray[i]); >
- Please save your script and test the game; you should see that, after clicking on some of the cards, that these cards have been shuffled, as described on the next figure.

Figure 26: Displaying the card (after shuffling)
Void addACard(int row, int rank, int value)Next, we can modify the function AddACard as follows:
Next, we just need to change the naming of the new card.
GameObject. Find(""+value).GetComponent ().setOriginalSprite (s1);GameObject. Find(""+row+"_"+value).GetComponent ().setOriginalSprite (s1);
Figure 27: Displaying two rows of cards
So, in this case you can resize the collider as follows:

- Select the prefab called Tile in the Project window. Scroll down to the component called Box Collider 2D. Change the size of the collider to (X=5, Y = 7).
Allowing the player to choose cards from each row

Next, we can implement the code that checks how we handle clicks on cards.
Private bool firstCardSelected, secondCardSelected;
Public void cardSelected(GameObject card) < if (!firstcardselected) < firstcardselected = true; card1 = card; card1.getcomponent().revealcard (); > >
Public void OnMouseDown() < print ("you pressed on tile"); /*if (tilerevealed) hidecard (); else revealcard ();*/ gameobject.find ("gamemanager").getcomponent().cardselected (gameobject); >- We comment the previous code. Now, when the player clicks on a card, the function called CardSelected (that we have defined earlier), is called. The card that the player has just selected is also passed as a parameter.
Next, we will further code the overall management of the game.
Private string rowForCard1, rowForCard2;

Figure 29: Picking one card from each row
Checking for a match
Bool timerHasElapsed, timerHasStarted; float timer;
Please add the following function to the class:

Figure 30: The game after two cards were matched
Next we will add a sound when the player has managed to match two cards:

Figure 31: Adding an Audio Clip to the Audio Source

Figure 32: Setting the attribute Play on Awake
Next, we need to check how many cards the player has managed to match.
>> If you enjoyed this post, then you can download the pdf version of this post, and many more free pdf books on Unity Game Development HERE
Related Articles:
Как создать собственную карточную игру?

- InDesign. В DTP Adobe InDesign стал САМЫМ Программное обеспечение эталонный дизайн и верстка. … Иллюстратор. Illustrator — еще одно известное имя в пакете Adobe. … Фотошоп. … Можешь идти. . Издатель. … Слово.
Как создать воображаемую карту мира?
Как легко создать видеоигру?
Как создать интерактивную карту в HTML?
Как сделать географическую карту в Excel?
Как создать интерактивное изображение?
Как интегрировать интерактивную карту на свой сайт?
Как создать персональную карту мира?
Дайте название вашему Меню , . Введите адрес, который вы ищете, в строке поиска и нажмите «Поиск». Место отображается с (зеленой) меткой, нажмите на метку и добавьте в Меню . Щелкните слой без названия и переименуйте его.
Как сделать карту по географии?
3. Основные элементы для Создать карту
а) Название. Название является первым из основных элементов. … б) Легенда. … в) Руководство. … г) Масштаб. … д) Источник. … f) Ярлыки и топонимы. … г) Карта местоположения.
Как сделать конкурентное картографирование в Excel?
Как сделать конкурентное картографирование в Excel - Руководство
Шаг 1 – Подготовьте данные. … Шаг 2. Вставьте пузырьковую диаграмму (лучший стиль диаграммы для карты восприятия). Шаг 3 – Откройте окно РЕДАКТИРОВАТЬ СЕРИИ. … Шаг 4 – Выберите данные, которые будут использоваться Excel составить перцептивную карту.
Как активировать Power Map?
Как иметь пустую карту на Google Maps?
Как создать персональную карту с помощью Google Maps?
Как рисовать на Google Maps?
На вашем компьютере войдите в Мой Карты . Откройте или создайте карту. … Щелкните Нарисовать линию. … Выберите слой и нажмите, чтобы начать свой путь. … Щелкните каждый конец линии или каждый угол фигуры.
Как аннотировать карту Google?
Как ставить булавки на Google Maps?
На мобильном устройстве откройте приложение Google Maps . . Найдите пункт назначения, затем коснитесь «Маршруты». Выберите вид транспорта. Если вы выбрали «Общественный транспорт», выберите предпочтительный маршрут. Внизу экрана нажмите Закрепить.
Как проложить маршрут?
Нарисуйте путь или многоугольник
Откройте Google Планета Земля. Перейдите к месту на карте. Нажмите на кнопку «Добавить Trajet , расположенный над картой. … Диалоговое окно «Создать» Trajet или "Новый полигон".
Как рисовать в Google Earth?
Как мы рисуем карту?
Как создать одноразовую карту?
Как создать карту à Одноразовый
Делайте покупки вместе с нами в приложении Klarna. … Установите сумму, которую хотите потратить. … Оплата на сайте магазина. … Произведите оплату с помощью Меню à Одноразовый , . Проверьте в приложении, есть ли какие-либо новые функции.
Как создать виртуальную карту Mastercard?
подключиться к сайту банка и идентифицировать себя с предоставленными идентификаторами. … указать общую сумму транзакции, и срок действия номера Virtuel ; сгенерировать число, нажав соответствующую кнопку;
Как создать виртуальную карту в интернет-банке?
La Виртуальная банковская карта : Комментарий Ка Марше?
Подключиться к личному кабинету (логин, пароль). Указать сумму покупки, подлежащую оплате в соответствующей валюте; Возможно изменение срока действия эфемерного номера; Сгенерировать номер Виртуальная банковская карта ;
Как создать виртуальную карту Banque Postale?
Условия подписки на электронную услугу Карта Bleue
прямо из Личного кабинета в Интернете, в несколько кликов, перейдя в раздел Наше предложение > Аккаунты и Карты > Услуги, с вашим офисным консультантом Поставленный , по телефону из вашего финансового центра,
Как получить эфемерную карту?
Какой банк предлагает виртуальную банковскую карту?
Какие банки предложение Виртуальные банковские карты ?
Как купить виртуальную карту?
Une Nouvelle Виртуальная карта через минуту
Войдите в свою учетную запись Online. ePayService и перейдите на страницу заказа Меню . Выбрать Меню нужного значения или заполните поле Меню с желаемой суммой. Ваш Виртуальная карта готов к использованию менее чем за минуту.
Как получить кредитную карту PayPal?
Вам просто нужно AVOIR профессиональный аккаунт PayPal .
1 Подайте заявку сегодня со своей профессиональной учетной записью PayPal , или откройте. 2 После получения вашего Меню , активируйте его, войдя в свою профессиональную учетную запись PayPal . 3 Покупайте в точках продаж и в Интернете.
Источники:
Https://learntocreategames. com/how-to-create-a-card-game-in-unity/
Https://sosordinateurs. com/ru/gaming/comment-creer-un-jeu-de-carte-personnalise/